Saturday, October 29, 2011

New things at Laynie Bug Designs!!!

Melissa at LaynieBugDesigns on Facebook has become more than just an awesome lady to get cute hair accessories from, she's my internet pen pal :). Through doing reviews and other various things for her on my blog I have developed the kind of relationship that one can ask favors of, in the hair accessory department.. 
So to start my little review off here is a story. 
I found a DIY tutorial for a braided headband that was made out of an old t-shirt on Pinterest. I pinned it with the thought of "I'll make that some day when I am not in school..." Then Tony and I went to the Homecoming game for my University and I needed to wear something white, seeing as our shirts are grey it didn't really go with the stupid requirement of wearing white. So I dug into my pinterest and found the braided headband and decided I was going to knock one out the night before. It was successful but I had to tie mine in the back, the next day it dawned onto me that Melissa would be able to do wonders with this tutorial and I was right (she doesn't use old t-shirts though to make them)!!!

Here is the braided head band.

$6 a piece or 2 for $10


What I love most about these is it doesn't feel like you have anything in your hair at all, they do not fall out. Usually headbands will slip right off my head which is amazing because I have a crap ton of curly hair. They add something fun yet subtle to your hair and you can wear them with a flower or with nothing at all, with your hair up or down!!

The other new thing that Melissa has came out with is the in the last couple of months and I got the joy of trying out is the elastic headbands and hair ties. These things are pretty amazing, I like that the hair ties do not cut off your hair something that is really common for hair ties to do if you constantly have your hair up is that they will eventually break your hair off. These are strong enough to hold your hair in place yet too weak to cause breakage. 

Headband price... good question comment below Melissa and tell us!!!

Hair ties are $1 each.. 

I LOVE the headbands because they are smooth and flat, perfect for attaching a flower to if you want and they also do not slip off your head. They're also hardly noticeable like the braided headbands, I really like these and will probably be buying more in the future. They are perfect for just getting your hair out of your face..


Through my obsession with pinterest I also found an awesome way to get lift at your crown without having to tease your hair I am not a big fan of teasing I like when other people do it to me like my fabulous hair stylist and when other people do it to themselves but me doing it to myself is a no. It probably has something to do with the fact that I am lazy and that I am to afraid to do it to my curly hair because I never straighten it :)

So I thought I would share this one with you!!

I always pull my bangs back into a little poof so you totally do not have to do this step. But your going to start by gathering the hair right at your crown like you are going to tease it except you are going to push it up and clip it with a small clip, I leave the front sections around my face down, when you've done this it should look something like the photo.. 


You are then going to gather your hair into a ponytail or messy bun and get it as close as possible to the little clip you placed into your hair. Once the pony tail or messy bun is secured then remove the clip and you have volume at your crown like you teased it!!

End product....


Excuse my tired look in all of these photos I got up early this morning to write a paper on Van Gogh and then I am going to school which I hate doing on a Saturday to get a depressing fitness test for one of my classes :(.. 

Happy Halloween weekend!!!

Friday, October 28, 2011

New Yummy Recipes

I found these two recipes on Pinterest and twisted them a little to make them my own. They where so good I decided to take some time out of my Friday to share them with you guys :)

This one is a super simple desert that I made even easier by buying store bought cookie dough. 

Cookie Dough Cheesecake Bars

Step one: 
Spray 8 or 9in square pyrax or metal oven safe container with cooking spray
Combine 1 1/2 cups of gram cracker crumbs with 5 tbsp of unsalted butter
Bake in oven for 6 minutes on 325.

Step two:
take 10oz of room temp cream cheese and combine that with 1/4 cup of sugar mix with blender until smooth then add one egg and 1 tsp of vanilla extract. Set aside, when cracker crumb mixture is out of oven and cool poor cream cheese mixture over the top. 

Step three: 
Take a small tube of store bought cookie dough and take hunks of the dough flatten them into disks/mold them into the shape of the pan and then put them over the cream cheese lightly. I let my cookie dough sit out for a bit while I was doing the two steps up above. Cover majority of the cream cheese with the cookie dough mixture. 

Bake all of this for 30 minutes or until the top feels firm and when you shake the pan it doesn't giggle anymore.
This last step is a must once the bars are done baking and have cooled down where you can no longer feel hot heat on the bottom of the pan REFRIGERATE before consuming or you will have nasty bars and you will ask why you baked this. At least that't what I did, these bars taste 10 times better if allowed to chill in the fridge for awhile. 

If you want the original recipe because I did not follow the exact instructions go here!!


Slow cooker Chicken Papikash Recipe

This is such an easy dinner to make, I made it just this last Wednesday before heading to class and when I got home all I had to do was make the noodles!!

Step one:
Combine 15oz of tomato sauce and tomato sauce can full of water with one can of green beans and one can of corn I rinsed and drained the corn and green beans. Add one small onion. Take Mexican chili powder, cumin, 1 dash of red pepper flakes, black pepper and paprika add those spices to your liking. (I went of the normal recipe here because it only called for salt, black pepper and paprika which did not sound very tasty to me.
Mix that together.
 Add frozen skinless chicken breasts or thighs (can use fresh, I just didn't have any so I put two frozen breasts in) to mixture, cook for 4 1/2 to 6 hours in your crock pot. 

Step two:
Check on your mixture at about 5 1/2 hours, that is when I noticed my chicken was cooked, ladle out 3 to 4 ladle fulls of the juice and SLOWLY combine it with 3/4 cup of sour cream. You do not have to do this step it just mild's down all the spices so it is not as hot, the reason why you cannot add the sour cream directly into the crock pot is because the sour cream needs to be tempered so it does not curdle and become nasty.  
Turn your crock pot onto warm if it has that setting or turn it off and keep the lid on it.

Step three:
Bring water to a boil on stove and add egg noodles cook until done, about 10-12 minutes of boiling.
Once noodles are done and drained, place noodles in bowl and top it off with the crock pot mixture. 

Enjoy!! 
This made enough for two people and for Tony's lunch the next day, it was pretty good.
If you want the original recipe, because once again I did not follow it go here!!


Hope you all have a safe and fun Halloween!! 

Want to follow me on pinterest or receive an invite to join this addiction leave you email address as a comment and I will send you an invite :)

Sunday, October 16, 2011

Smashbox and Urban Decay Review

Before school started I had intentions of wearing make up to class every day, my reasoning was I needed to start acting like an adult aka looking professional so it is a habit when I start working.. I figured that using a tinted moisturizer was going to make it easiest on myself. So I started out with e.l.f studio tinted moisturizer that I picked up from Target for 3.99. It was horrible, it was to dark it smelt nasty and it wouldn't every absorb into my skin all the way which left my face looking incredibly greasy. It was gross!!


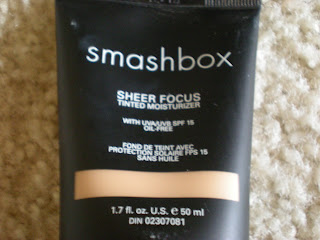
So I gave up hope on being an "adult" until I bought Smashbox's tinted moisturizer called shear focus I was really reluctant at buying this because of it its price I didn't want to spend money on something that wasn't going to work on my skin and that I would just end up throwing away once I figured out how much of a waste of money it was.  But this I can honestly say was worth all $30 I spent on it, it doesn't stink, look weird on my skin or make me feel like I have a mask on. It is build able which is nice and you don't have to set it with a powder unless you want more coverage. Without setting it it is a shear coverage similar to what you would get with a mineral powder foundation if you set it with a powder it is full to medium coverage which is more than I am used to. I have this in the shade fair but now that my tan has faded and I am becoming pale again I would probably be more in the luminous shade. Smashbox offers five different shades which is helpful because you will be more likely to find your correct shade. The other good thing about this product is that it has an SPF of 15 and doesn't cause a white cast when photographed. 
I would definetly recommend this brand and specifically this tinted moisturizer to a friend which is probably why I am recommending it to all of you!! If you are in the market for a tinted moisturizer I highly suggest this one. 

In this photo I have Smashbox shear tinted moisturizer on with MAC's Mineral Skinfinish Natural in the colors  light and medium, I use the medium as a bronzer on my cheeks and temples. Then my blush is Mary Kay mineral blush in Strawberry Cream. 

My next new favorite product is the Urban Decay Naked eye shadow palate. I love this palate simply because it is a great combination of browns and coppers as well as black. You can create a variety of looks with this palate anything from natural make up to a good smokey eye. Its really versatile and worth the money because it is sooo pigmented you only need a little to go a long way, I have a feeling I am going to have this palate for awhile. The brush that comes with the palate is really good it is a stiff eye shadow brush so it is good for defining areas and smudging under the eyes, I think it would be good to use for eyeliner with a dry shadow but I haven't tried it yet. It's also a good brush for packing. The palate is $48 again totally did not want to buy this palate simply because of the price but I swatch'd it on the back of my hand and could see why it was that price that and Tony bought it for me as a gift. I would recommend this palate if you can afford it if not I know there are better alternatives like physicians formula shimmer strips they are only $10 and they are geared toward your specific eye color to help them pop. I know they are pigmented and a good product overall. 

I wish I would have done a look for you guys with this palate but I don't have the time to wear make up to school let alone do a look for you guys. I am putting it down on my list of blogs to do in the future..